- Creating and Managing Pages in WordPress: A Step-by-Step Guide
- **Key Takeaway**
- Understanding WordPress Pages
- Creating a New Page in WordPress
- Creating Subpages
- Managing Page Settings
- Editing and Updating Pages
- Deleting and Restoring Pages
- Changing the URL of a WordPress Page
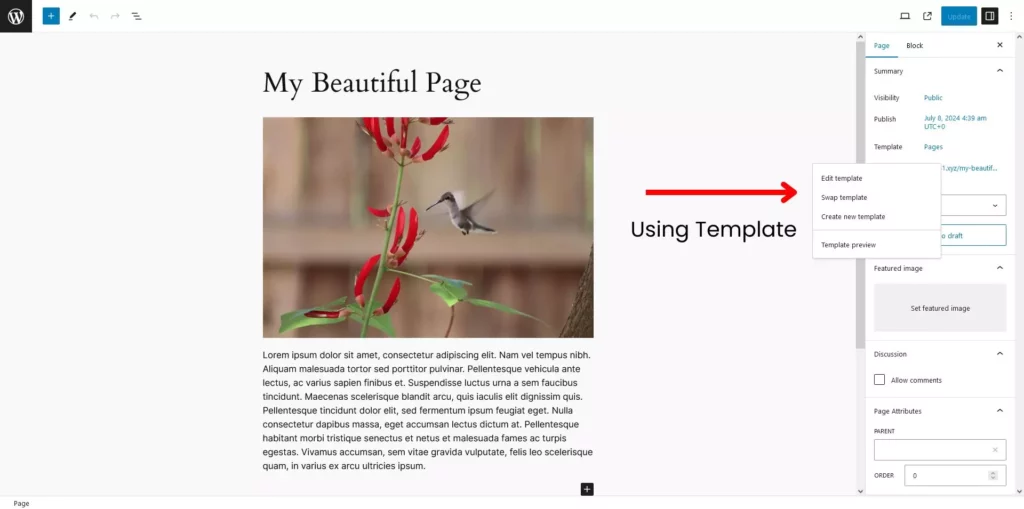
- Using WordPress Page Templates
- Conclusion
Creating and Managing Pages in WordPress: A Step-by-Step Guide
WordPress is a versatile platform that allows users to create a variety of content, including pages.
Pages are used for static content such as “About Us,” “Contact,” and “Home” pages.
This comprehensive guide will walk you through the process of creating, managing, and optimizing pages on your WordPress website.
**Key Takeaway**
– Managing pages in WordPress is essential for any website owner.
– This guide is a walkthrough of creating, and managing WordPress pages.
– Adding content
– Configuring page settings
– Publishing pages
– Proper management enhances the overall functionality and visibility of your website.
Understanding WordPress Pages
What Are WordPress Pages?
Pages in WordPress are static content types that are different from posts.
Unlike posts, which are listed chronologically, pages are typically used for timeless content that provides essential information about your website.
Common Uses for Pages:
- Homepage: The main landing page of your website.
- About Us: Information about the website or business.
- Contact: Contact details and forms for visitor inquiries.
- Services: A list of services offered.
- Privacy Policy: Information about data handling and privacy.
Creating a New Page in WordPress
Creating a new page in WordPress is straightforward. Here are the steps:
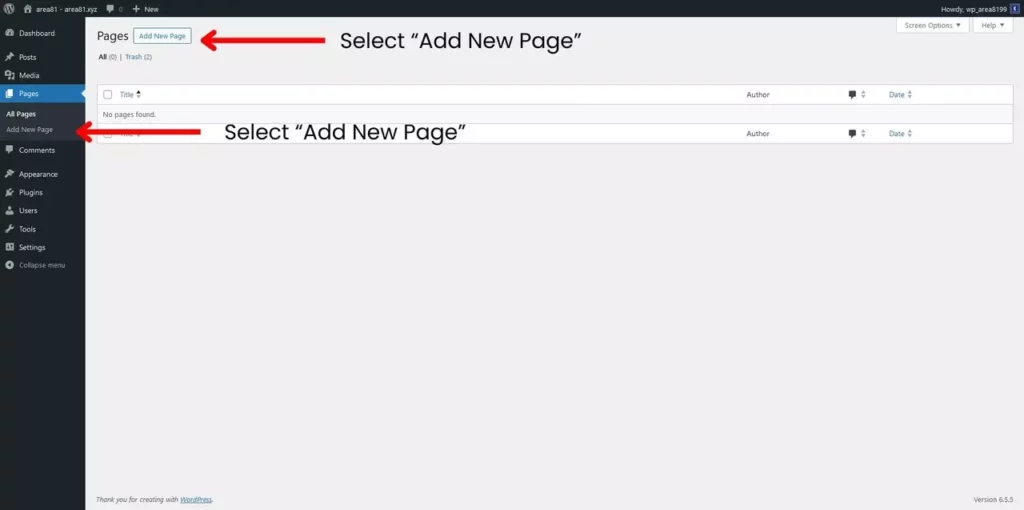
1. Accessing the Dashboard: Log in to your WordPress dashboard. From the left-hand menu, navigate to Pages and click on “Add New Page.”
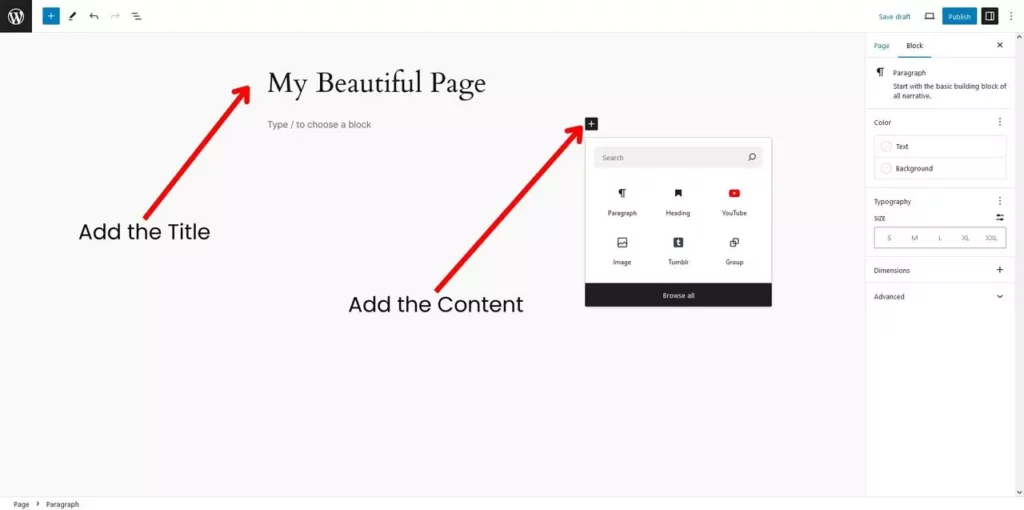
2. Adding a Title: At the top of the page, enter a title for your new page. This title will appear as the headline of the page.
3. Adding Content: Use the WordPress editor to add content to your page. You can add text, images, videos, and other elements using blocks. The block editor makes it easy to structure your content in a visually appealing way.
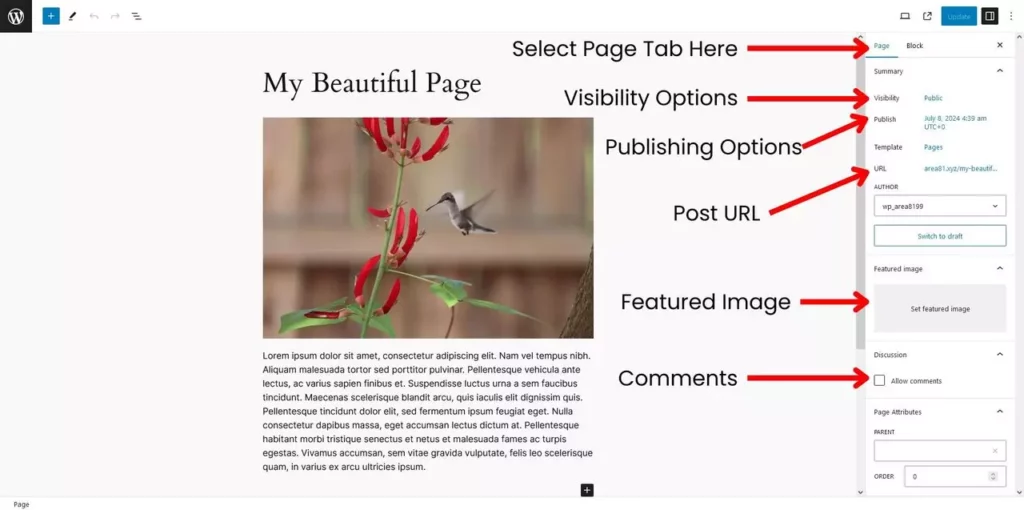
4. Configuring Page Settings: On the right sidebar, you will find various settings to customize your page. These include visibility options (public, private, password-protected), publishing options (immediate or scheduled), and other attributes like parent pages and order.
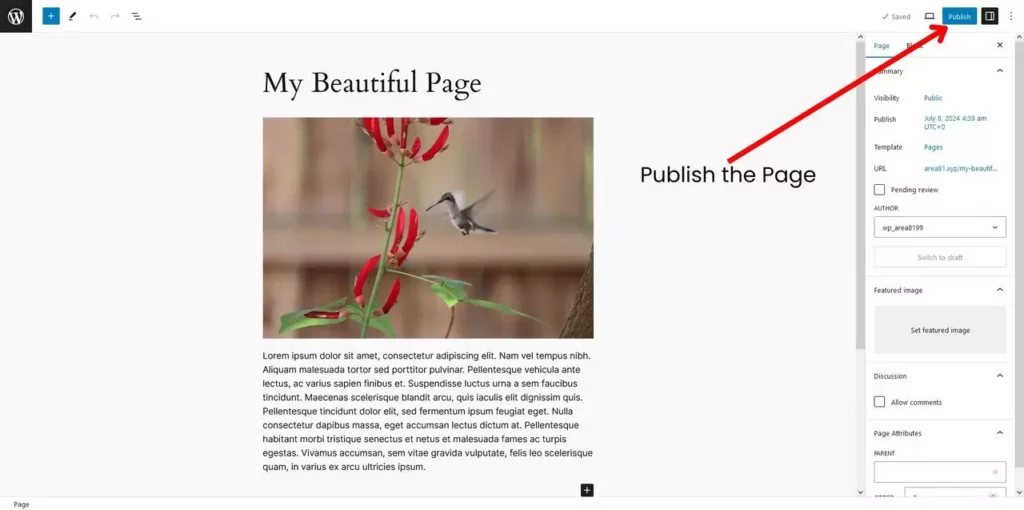
5. Publishing the Page: Once you have added and configured your content, click the “Publish” button in the top right corner to make the page live on your website.
Creating Subpages
Subpages help organize your content hierarchically. For example, you might have a main Services page with subpages for each specific service you offer.
To Create a Subpage:
1. Follow Steps 1-5 Above: Create a new page as described above.
2. Set the Parent Page: In the Page Attributes section, select the parent page from the dropdown menu.
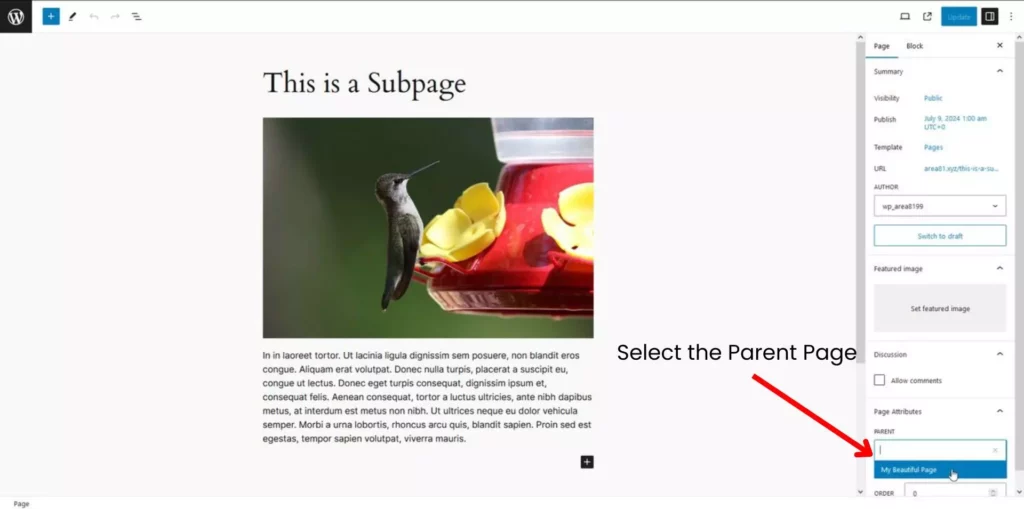
3. Publish: Click “Publish” to create the subpage.
Managing Page Settings
WordPress provides several options to manage and customize your pages effectively:
- Visibility: Control who can see your page. Options include public (anyone can view), private (only visible to site admins and editors), and password-protected (only those with the password can view).
- Publishing Options: You can publish a page immediately or schedule it for a future date. This is useful for planning content releases.
- Templates: Choose or create templates to control the layout and design of your page. Templates can include different headers, footers, and sidebars.
- Permalinks: Customize the URL of your page to make it more SEO-friendly. A clean and descriptive URL can improve search engine rankings.
- Featured Image: Set a featured image to represent your page. This image can be displayed in various places across your site, depending on your theme.
- Discussion Settings: Enable or disable comments on your page. This is useful for static content where you do not want user feedback.

Editing and Updating Pages
After publishing a page, you may need to make changes or updates. Here’s how you can do it:
1. Accessing the Page: Go to Pages in the dashboard and select the page you want to edit. You can use the search function to find specific pages quickly.
2. Making Edits: Use the block editor to make changes to your content. You can add, remove, or rearrange blocks as needed.
3. Saving Changes: Once you have made the necessary edits, click the “Update” button to save your changes.
Deleting and Restoring Pages
When managing your WordPress pages, you may occasionally need to delete or restore a page. Here’s how you can do it:
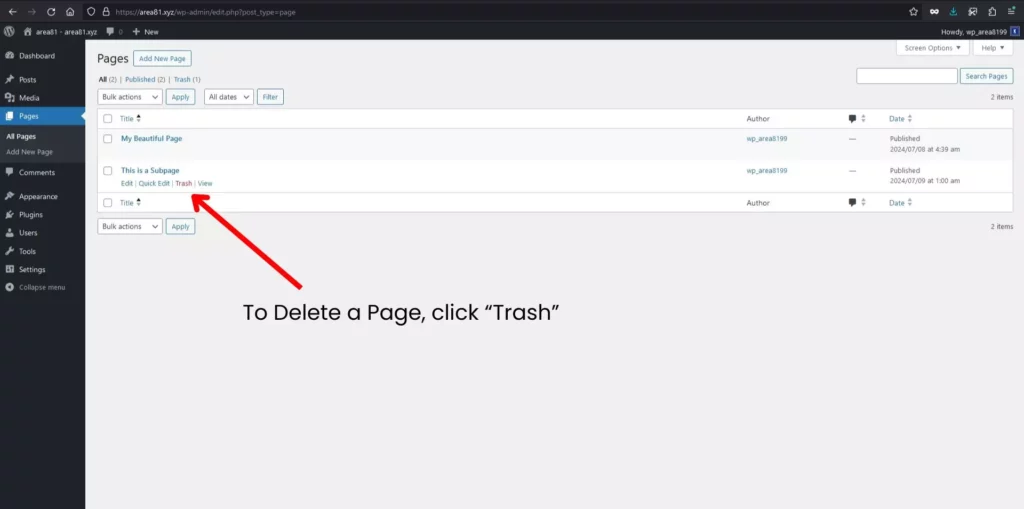
- Deleting a Page: To delete a page, go to Pages in the dashboard, hover over the page you want to delete, and click “Trash.” The page will be moved to the trash folder.
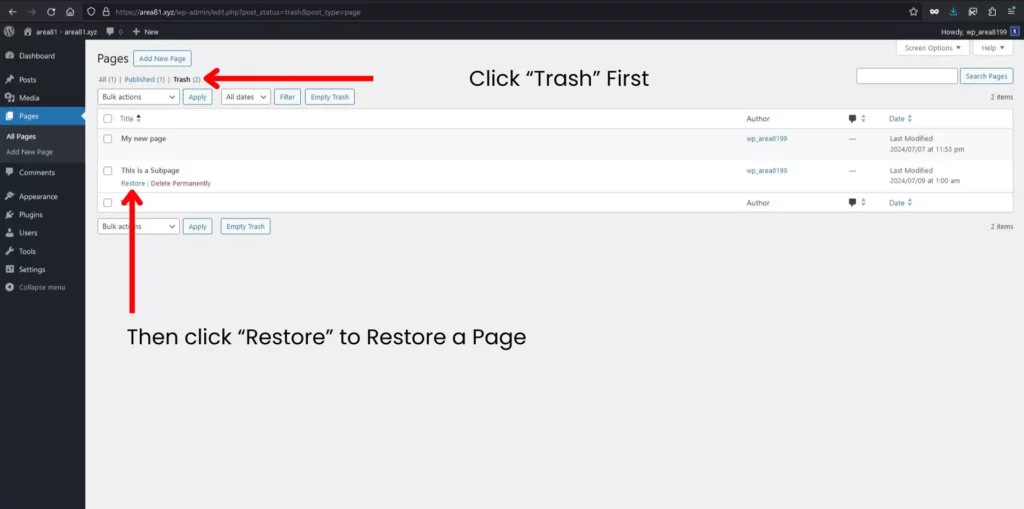
- Restoring a Page: If you accidentally delete a page, you can restore it from the trash. Go to Pages : Trash, find the page you want to restore, and click “Restore.”
Changing the URL of a WordPress Page
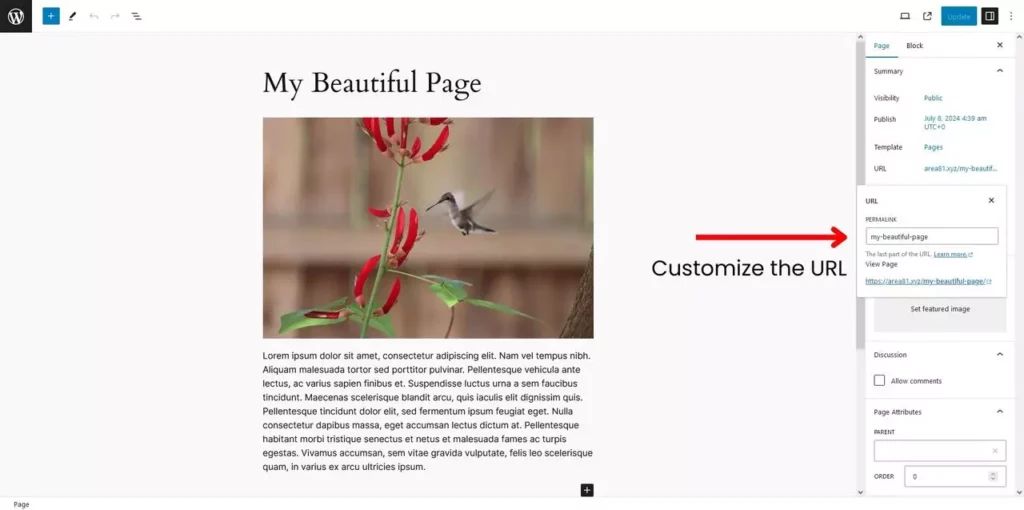
You can customize the URL slug of your page for better SEO. In the page editor, click on the URL below the title and edit the slug to your preferred format.
Using WordPress Page Templates
Page templates control the layout of your pages. Depending on your theme, you might have different templates available, such as a full-width template or a template with a sidebar.
Conclusion
Managing pages in WordPress is an essential skill for any website owner. By following the steps and best practices outlined in this guide, you can create, manage, and optimize your pages effectively.
Need help with WordPress? Hire us today – we’re here to help and make your WordPress experience smooth and hassle-free!


